Restoration project part (1)...
After the move to our Victorian home in August of this year we decided that we would try to restore as best we could our home to its former glory. I am not liking the way the house is at the moment! It saddens me that people rip out such beautiful features to a house like fireplaces, hearths, tiles, ceiling roses, cornices...the list is endless and instead replace with nasty modern alternatives that just don't fit the design or cosmetic make up of the style and period of the house.
Having my own interior style, very much inspired by Nina Hartman I was very keen to get cracking, BUT before we could get to the exciting bit of trawling through antique and vintage markets and of course sourcing bits and bobs from France we needed to pay attention to more pressing problems that lied ahead!
As the saying goes one problem leads to another...15/10/13
So there was bound to be something that would rear its ugly head, especially in an old house like this and rear its ugly head it did. We started by addressing the annoying drip, drip, drip that would come down the kitchen chimney flue at every down pour. That coupled with the upstairs fire breasts that have horrid water marks on the wall which are deposits of salts that have built up over the years through the coal that was once burned which is drawing in the moisture from inside the house.


So up went the scaffolding which has just about managed to survive the mini hurricane we have just had, although two boards did become dislodged! All the flashings needed to be replaced, pointing re-done and re-rendered to seal in old cracked plaster.


We had all 5 chimneys sweep by a chimney sweeper and was amazed at the amount of debris and soot that came out. Our front room looked like a volcano has just exploded!
Wet Rot - we like not! 30/10/13
Wet Rot - we like not! 30/10/13
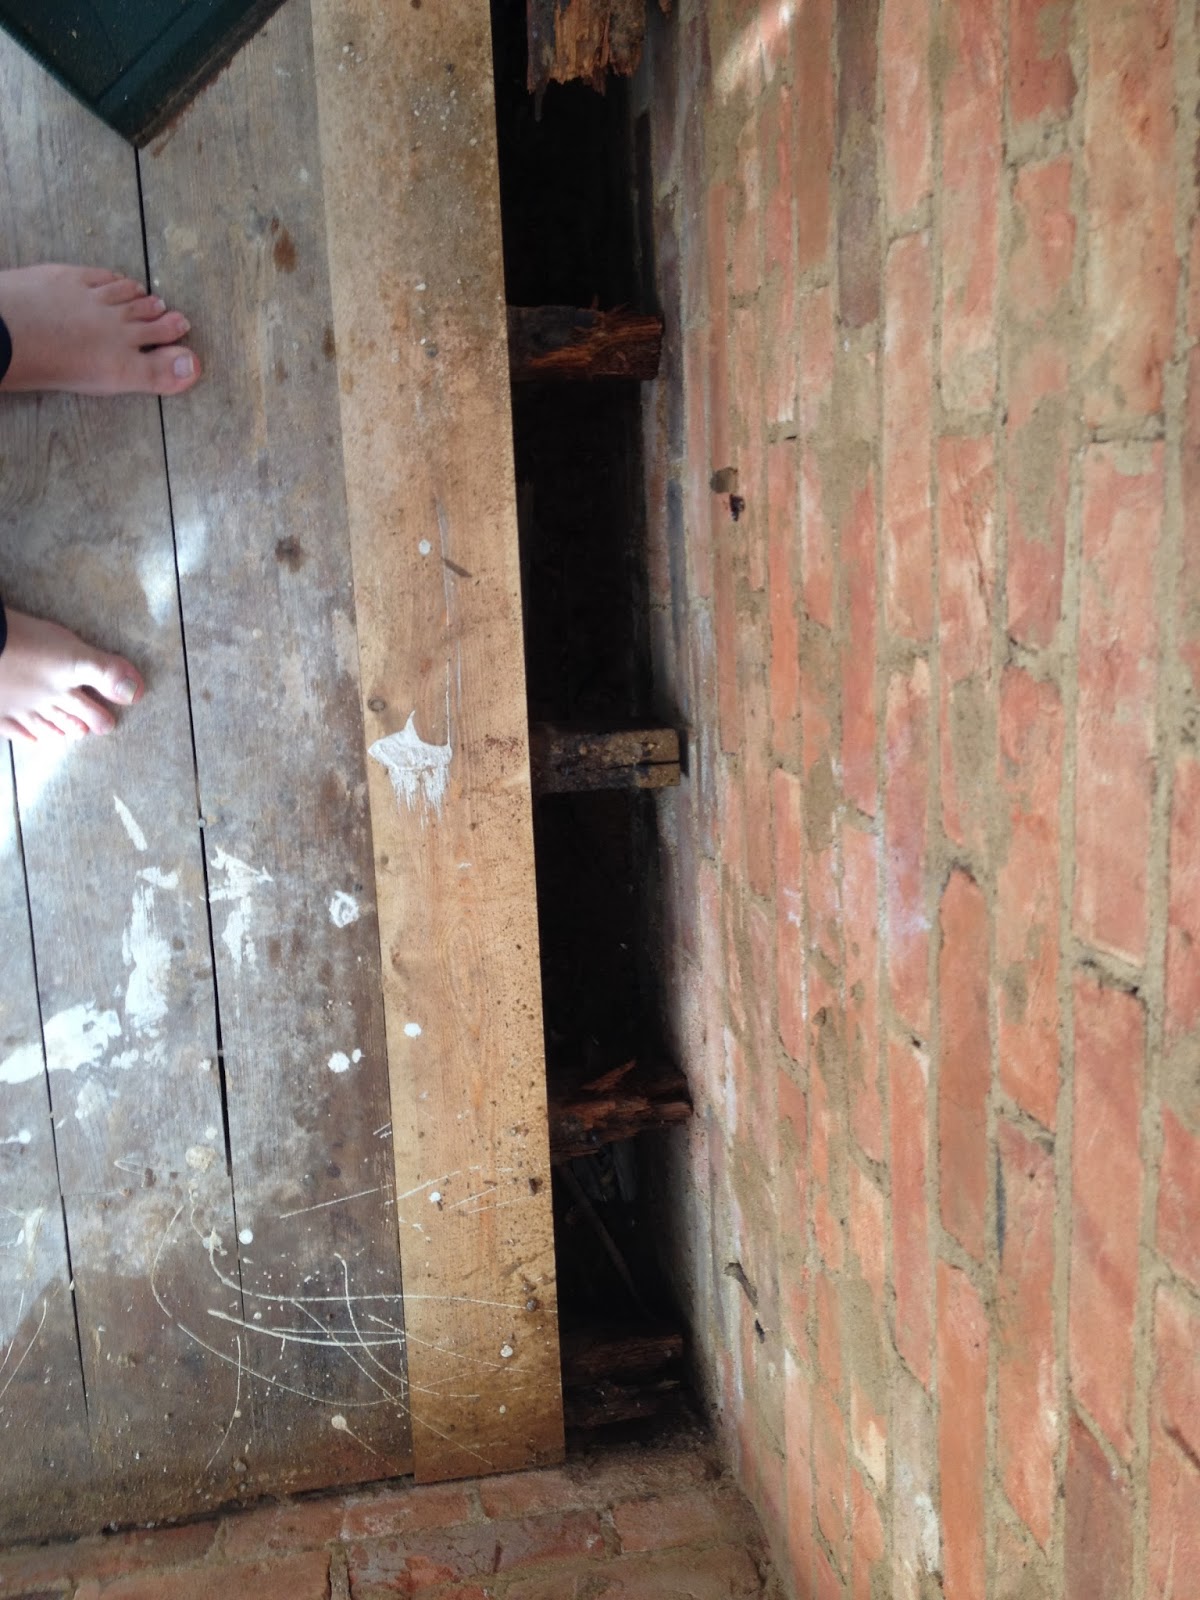
Next we found out that we have wet rot in out back room and that the weaver beetle is active. New airbricks needed to be put in and x5 new joists will needed to be removed as well as floorboards and skirting. We are annoyed at the fact that the previous owners had cavity wall installation put it and this has caused more problems. Victorian houses are not meant to have this useless substance injected into the walls - it stops the bricks breathing thus allowing for inadequate escapism of moisture. Cavity walls trap the moisture leading to damp walls and that is exactly what we have in places.
I cannot highly recommend enough the company that we used called PROKILL. They have done an excellent job - very professional and work is of the highest standard. Luke, the guy that did all the work to our back room did a fantastic job! Here are the before and after photos...


Ceiling time...5/11/13
And to the ceilings we look and see hideous cracks on both the front and back room ceilings so we will need to get these both skimmed. Jason, our plasterer did a fantastic job here making good of our two ceilings...
Before, I know you can't really see much here but they were lumpy and cracked...


After, a smooth finish to both the back and front room...


Strip back the little Victorian fireplace 4/11/13
What is the plan now? Well, now I can get a little excited as we're planning to do up my little Ayla's bedroom - hooray! Ayla is now 23 months and the poor little thing hasn't has her own bedroom yet. We were in a flat before and there was no room to create a room for her. I have SO MANY ideas and have already bought some beautiful antique linen for her iron bed. The first job will be to strip this little fireplace.
Before, the fireplace was painted in a horrid black matt paint which was thick and took away the details...

...started to apply the peelaway...


...covered the fireplace with the paper...


...soaking up all the gunk - 24hrs on...you can see it soaking up the paint!

...not enough of the paint came off the 1st time around so we applied another coat and let it set for another 24hrs...

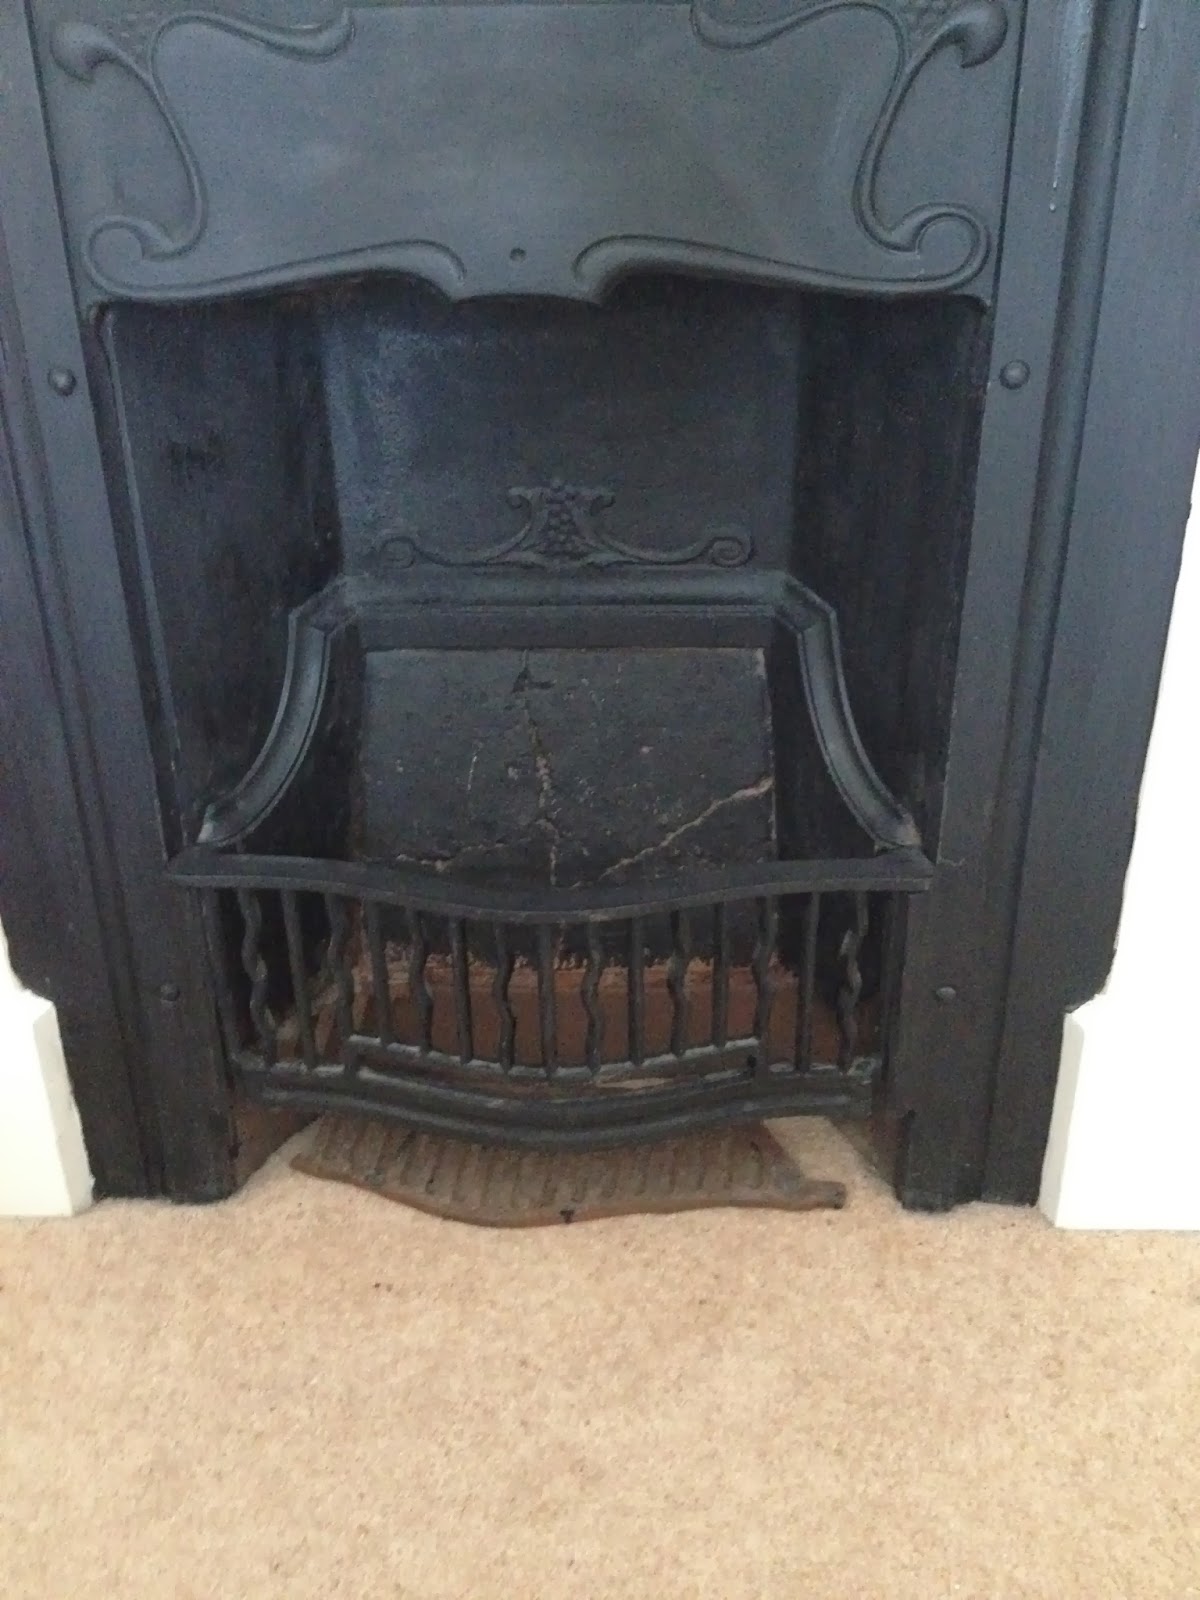
After all the gunk came off, it needed to be neutralised and left to dry for a day. I then applied the grate polish which brought the fireplace up lovely...

...a light buff...


...and here is the result - a lovely gun metal grey...

...finally I applied some charcoal fixative spray to stop any of the polish rubbing off...
I've also sourced some lovely Victorian fireplace tiles that will go down on the new hearth in Ayla's room as well as the two bedrooms upstairs. Watch this space for the development on Ayla's room...I wanted to say thank you to Christine for the expert advice she gave me from her blog Little House on the Corner this has given me the drive to attempt to do this myself!
Here is a lovely article that Christine from Little House on the Corner did on our fireplace!
We have also decided to strip the floorboards back and paint them white for Ayla's room. So as we started the fireplace we took back the carpets and started to remove all the dirt that has built up between the boards, removed old nails and took away some of the skirting that was badly put up by the previous owners.

...I have painstakingly started to remove the horrid black varnish with white spirit and steel wire wool, after this long job I will lightly sand and then it will be ready to prime.

...now the new skirting is on! Next job was to lightly sand the floorboards ...

...and apply a wood preserver...


...next I will go around filling some holes where the previous nails had been ready fro priming...
Rip up that floor! 7/11/13
So, my dad came down for the weekend and said he would have a look at our floorboards...little did we know that in the next hour our whole floor would be up! Yes, we had terrible wood worm in EVERYTHING including the joists so the whole lot of floorboards had to come up...its only thanks to my dad that we got this job done within 4 days...


...thank you dad! x
Up goes the stud wall 20/11/13
So now we have found a really good reliable tradesman, Luke is going to put up the stud wall that divides our front and back room. I've never liked what they did to the room opening up like this. Once the wall is up it will make the room more uniform and cosy. On the back room side of the wall I plan to build a cupboard that will hide my ugly 1998 computer and all those wires. I just don't like any technology on display its just the way I am but in my opinion its to be watched/used and NOT seen!

...up went the stud wall which was built up using a steel frame...


...new skirting on around the bay...

...lovely smooth plastered drying walls...


...on the other side - giving me extra space to put my lovely cupboard...

...putting up new picture rail too...
Chimney breasts in x2 bedrooms 23/11/13
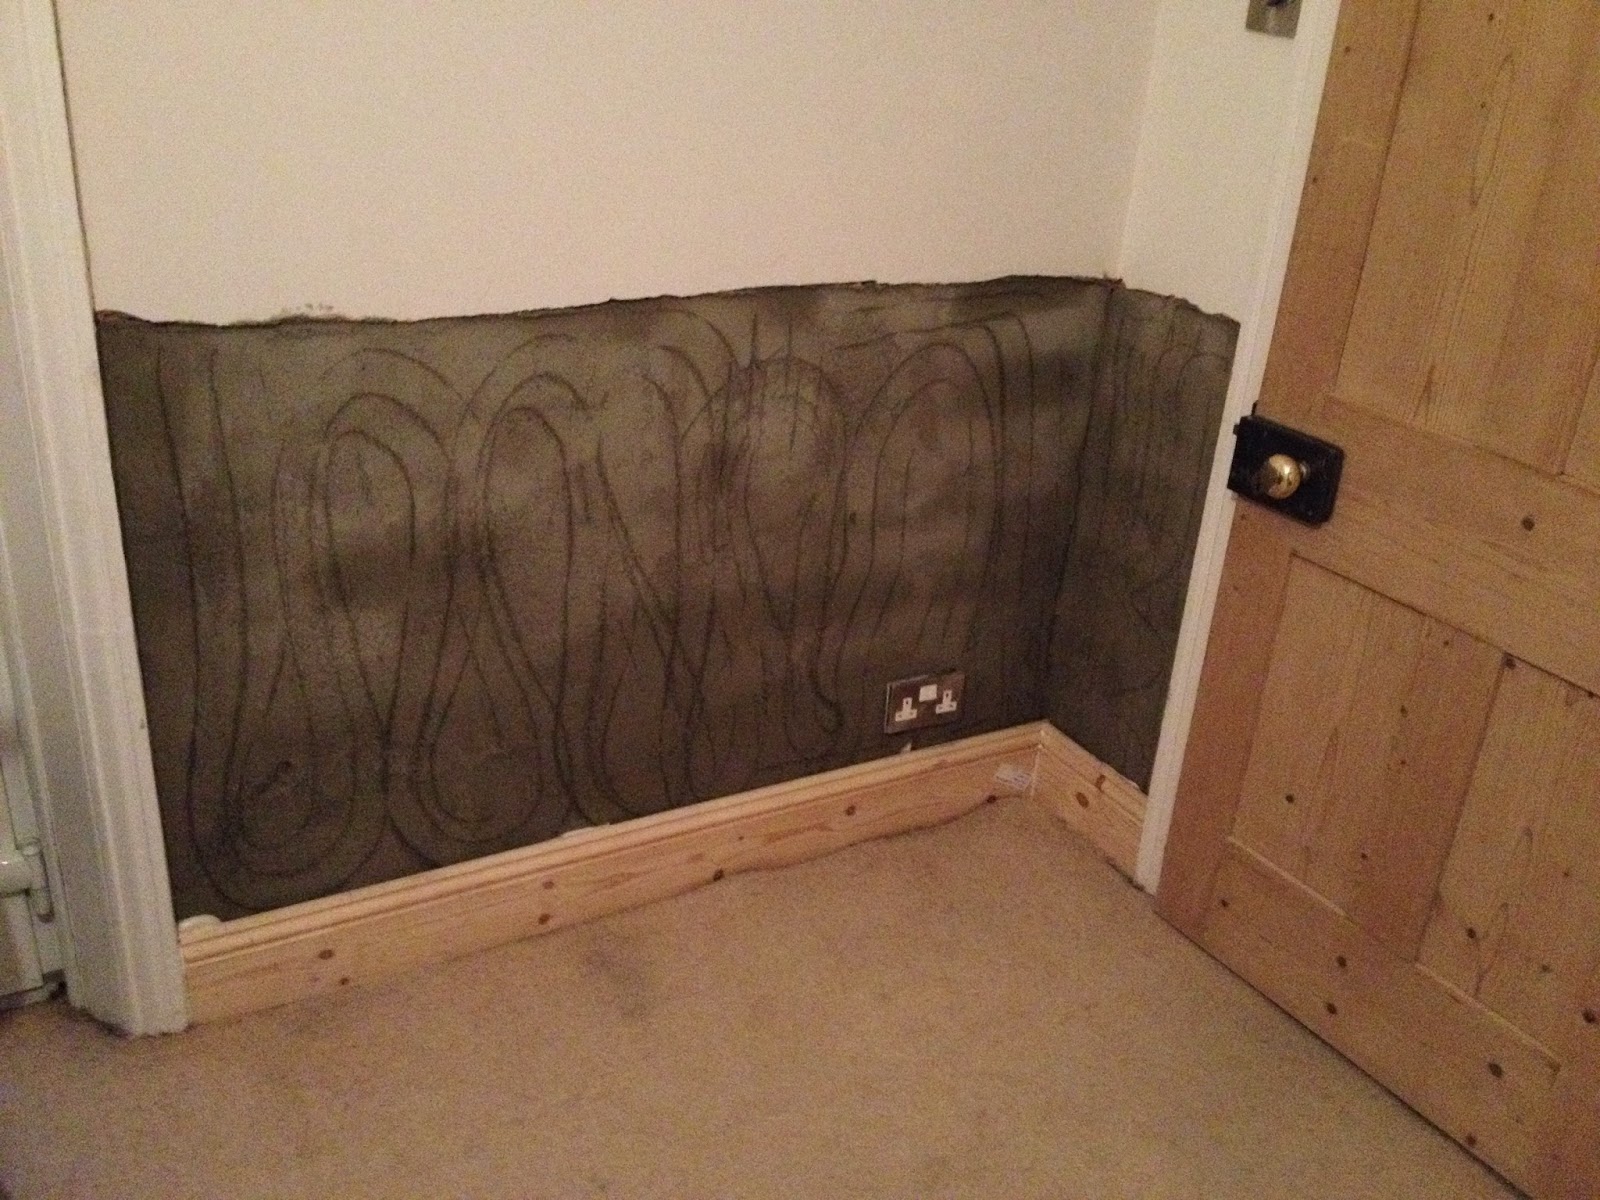
Carrying on from the work upstairs on the chimney breasts we decided that we would definitely need to hack off the existing plaster and re-do. This is the only way that we would be rid of the horrid salt deposits that had come through. At one point, I thought we had taken on too much all at once as we are pretty much living on a building site with no heating in the middle of winter and with a 2 year old can be quite draining at times...but despite all that and friends telling us we are mad, we want to get as much as we can done to the house in as short amount of time as possible!
Before...

...screening off the rooms with plastic sheets to stop the ton of dust settling onto everything in the bedrooms...

...old plaster off, the bricks underneath needed to be sprayed with anti-salt spray and new render applied...


After - lovely skimmed walls once again!


Ceiling Roses and Cornicing 10/12
I am so happy with these beautiful cornices that were put up by the Victorian Cornice Company. They have given our rooms back their elegance! I especially love the design of the one that is up in our back room.


The ceiling roses are simple yet elegant - I opted this style for the front and back room as the cornicing is quite elaborate and I didn't want the ceiling to start to get too fussy especially when a huge chandelier hangs down (that's my next mission).
The one in Ayla's room is beautiful and just the right size for her little room.
The company that supplied these cornices are based in Birmingham, yet they were willing to travel all the way down to us. I cannot fault them in anyway and the workmanship was second to none! Highly recommend these guys.
Victorian Fireplaces its time to go 16/12
Today we saw our two fireplaces in the top two bedrooms ripped out!
We've managed to source a man who will drive all the way from Sydenham in London to remove two of our fireplaces for sandblasting and refinishing is matt black as well as restoring all the missing parts - thanks Paul from RPS fireplaces!


 Paul and Paul did an excellent job removing these two fireplaces in just under 1 1/2 hrs...I would have attempted to do these fires myself but they are to big for me and way too many paint layers to be removed...Paul is back on the 15th January and we can't wait to see what they look like!
And so with a huge sigh of relief we can finally kick back now and start planning for Christmas with only two weeks to go eekk! I need a bottle of wine...see you in the New Year and have a lovely Merry Christmas and a Happy New Year!
God Bless,
Johnny, Vanessa and Ayla xx


The one in Ayla's room is beautiful and just the right size for her little room.
The company that supplied these cornices are based in Birmingham, yet they were willing to travel all the way down to us. I cannot fault them in anyway and the workmanship was second to none! Highly recommend these guys.
Victorian Fireplaces its time to go 16/12
Today we saw our two fireplaces in the top two bedrooms ripped out!
We've managed to source a man who will drive all the way from Sydenham in London to remove two of our fireplaces for sandblasting and refinishing is matt black as well as restoring all the missing parts - thanks Paul from RPS fireplaces!
Here are the before and after photos...

...our sad fireplace in back bedroom sits with none of her matching attire, she is not herself but will soon be!

...horrid exposed brickwork and rubble...
...nasty black paint on our bedroom fireplace which has been crudely painted on - yuk!

...horrid contrast on black and white - when its finished it will all be in black...
Now all we have is big holes in walls and lots of drafts blowing on us...why oh why do we do things in the winter!!


And so with a huge sigh of relief we can finally kick back now and start planning for Christmas with only two weeks to go eekk! I need a bottle of wine...see you in the New Year and have a lovely Merry Christmas and a Happy New Year!
God Bless,
Johnny, Vanessa and Ayla xx